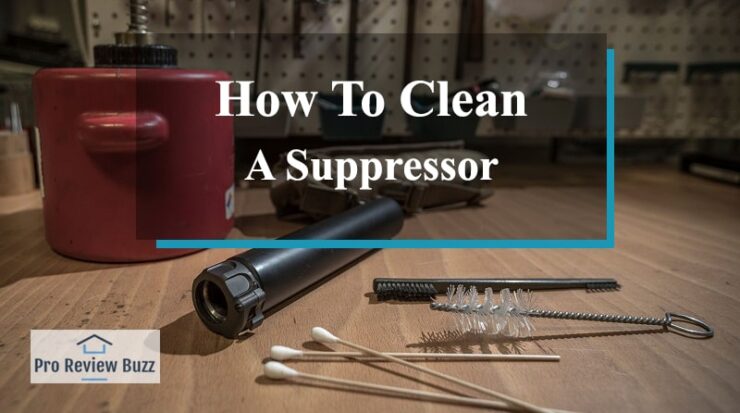
Do you want to clean a suppressor, but you don’t know how? Don’t worry because we will cover the most usual methods of cleaning it in the easiest way possible!
At first, cleaning a suppressor can be a little of a daunting experience. But it doesn’t have to be that way. If you learn how to clean it correctly, you can always achieve the best results without trouble. Here we are going to explain how to clean a suppressor the right way.
Care to discover more about it and become an expert in cleaning a suppressor? Then keep scrolling and learn!
If you are a responsible gun owner, you need regular cleaning of the suppressor to enhance its longevity. However, it is not just a cleaning; but the gun parts need to be disassembled for proper cleaning. Most people tend to ignore suppressors when they are cleaning the other part of the firearm. This article will discuss why cleaning suppressors is critical, cleaning methods, cleaning various guns, suppressor material, and components that need to be cleaned.
Why is a Cleaning Suppressor Essential?
The suppressor internal volume reduces when the carbon and lead build-up. The fouling leads to less room for the gases to calm down inside the firearm hence not working well. It interferes with the bore if carbon or lead fouling exceeds. It also interferes with the bullet’s flight path and causes baffle strikes. Generally, when a suppressor gets dirtier, the worse it performs.
Although modern suppressors rarely need cleaning since they are designed with self-clean capability. However, other suppressors need to be assembled and cleaned. For better performance, it is necessary to clean the suppressor frequently.
What is a Suppressor?
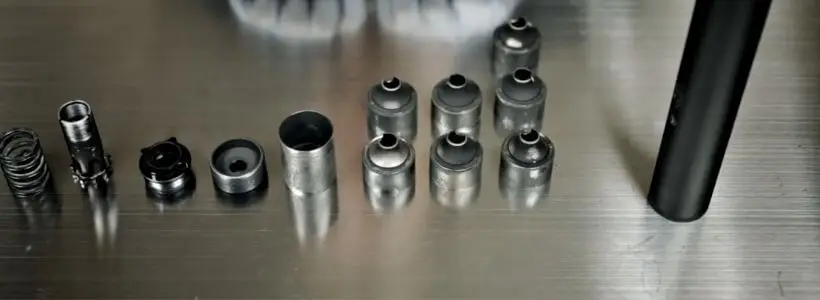
A suppressor, also known as a silencer, is a device that helps in reducing flash and sound intensity when a gun is fired. It is designed to cool and slow down the gas, which escapes while reducing sound and blast volume in the form of a metallic cylinder with internal sound baffles. The main parts of the gun suppressor that need to be cleaned include:
- Threads: The threads need a quick wide down or pass through a toothbrush to ensure it is precise and doesn’t cause any potential issue on the threads,
- Tube/end caps: It needs a simple wipe down with a soft cloth to remove any debris in the tubes.
- Boosters: most threaded firearms use boosters and tend to get dirty quickly. You should remove the booster to wipe and lubricate it.
- Monocore/baffles: depending on the design of your suppressor, either a monocore or baffle setup. Although it is easy to see the baffle or monocore, it can be hard to reach and clean. You can choose to use a solvent and toothbrush to clean it. For nooks and crannies, use a toothpick while paying attention to places where the metals meet.
- O-rings: o-rings are located between the booster housing and the piston. It requires gentle cleaning and lube to allow O-rings to function well. However, you should be cautious not to use ultrasonic cleaners and other chemicals to degrade the material.
Pros of using suppressors
- Great for beginners
- It ensures better accuracy
- It offers ear protection
- It makes the gun last longer
Cons:
- It can cause chamber blowback
What Elements to Target When Cleaning your Suppressor
- Carbon builds up- carbon is a byproduct of combustion in the barrel and accumulates everywhere in the firearm.
- Lead build up- it accumulates as a result of projectiles traveling through the gun’s barrel. As the projectiles make their way through the barrel, they peel off tiny slivers of lead and dispense them inside the suppressor. It is commonly found within the crannies and nooks.
How to Handle Different Suppressor build Materials When Cleaning
- Stainless steel suppressors- suppressors made from stainless steel are durable when cleaning and shooting. You need to be careful when using some chemicals due to the solvent and metal reaction.
- When cleaning aluminum suppressors, aluminum doesn’t use ultrasonic cleaners, harsh chemicals, and steel brushes. You can use safe solvents and brass or plastic brushes to prevent permanent damage.
- Titanium- since the titanium suppressor is lighter and durable, it is treated the same way as stainless steel. However, you need to be careful when cleaning the suppressor as they tend to be costly.
How to Clean Different Types of Suppressors
- Rimfire Suppressors
Rimfire suppressor tends to get very dirty. They should be cleaned after every 300-500 rounds due to lead buildup. The lead accumulates into the baffles/monocore; when it is not cleaned, it eventually turns into a solid tube of carbon and lead. It is advisable to clean the suppressors frequently, even if you run jacketed bullets.
- Pistol suppressors
Pistol suppressors should be cleaned every 750 rounds. If you use lead bullets, then lead fouling is expected in the cartridges and needs to be clean often. However, if you are not using lead bullets, then there is a chance that the pressure builds up in the suppressor and blows away any fouling in it. But if you doubt, use a solvent to clean it up.
- Rifle Suppressors
For rifle suppressors, they don’t need to be cleaned since most of them can’t be disassembled by the owner. The manufacturers state that these suppressors can handle up to 30,000 rounds without any decrease in sound reduction. Sometimes they experience some levels of buildup, and you can clean them with a solvent bath. It tends to decrease its performance if it fires over 100,000 rounds without cleaning.
Learn to Clean a Suppressor in Different Ways
Before you get into the details of how to clean a suppressor, you have to know that there are usually two types of suppressors: sealed and user-serviceable. So, we will cover the ways you can clean these two types of suppressors.
Cleaning a suppressor is not hard in any way unless you are entirely clueless. If you are, then follow the following 2 ways to clean it like an expert:
Different Ways to Clean Suppressors
1. Cleaning with an ultrasonic cleaner
Most guns or suppressors have tiny holes that prevent the cleaning solution from cleaning the dirt. For easy cleaning, you can opt for an ultrasonic cleaner. The cleaner will help you complete the cleaning task professionally as it can clean most of the parts in time.
When using an ultrasonic cleaner, you will need
- an ultrasonic cleaner with a basket
- Non-corrosive solvent.
Here are the steps:
Step 1: The first thing is to remove the basket from the cleaner and place the suppressor components onto the basket.
Step 2: pour the non-corrosive into the ultrasonic cleaner and add the basket with the components to it.
Step 3: let the suppressors run for some time, for the components will be residue-free. After wiping the solution, they are ready for use.
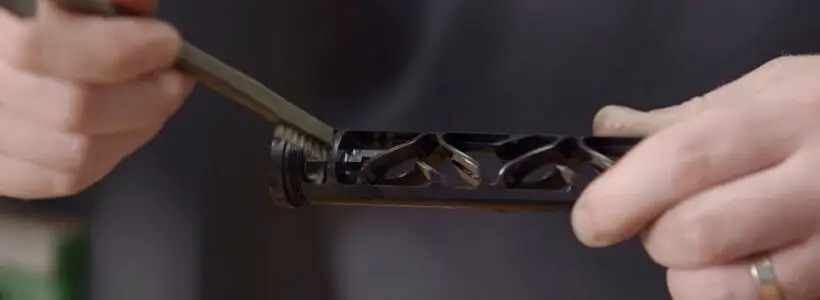
2. Brush and Solvent method
It is one of the most common methods for cleaning suppressors. You only need a toothbrush and solvent. One good thing about this option is that it is gentle and cost-effective. Within a few minutes, you will be able to clean the crannies and nooks without damaging the suppressor.
You will need:
- A toothbrush
- A cloth
- A toothpick
- A non-corrosive solvent
Here are the steps:
Step 1: You need to disassemble the suppressor
Step 2: Soak the baffles and tubes in the solvent for a few hours.
Step 3: Brush or wipe away the residue.
3. Dry Media Tumbler
Another way to clean the suppressor is using a tumbler with dry media. The recommended dry media for suppressors is the walnut media. However, it is not effective as most other methods.
You will require:
- A rotary dry tumbler
- Walnut media
Steps:
Step 1: Put the dry media and suppressor components into the dry tumbler.
Step 2: Turn it on and let it run for some hours.
4. Soda Blaster
Soda blasting uses sodium bicarbonate and compressed air to blast away the carbon and lead build-up. You need to be careful because if not contained, it can damage the components.
You will need:
- Soda blaster
- Blast box
- Sodium bicarbonate
- Shop-vac
Steps:
Step 1: Use the soda blaster to blow away any lead and carbon fouling.
Step 2: Repeat this process until clean.
Step 3: Flash airborne particles using a shop vac before opening it up.
5. Wet Media Tumbler
Wet tumbling is more effective than the brush and solvent method since it does not wear on the tubes, thread pitch, and overall suppressor parts.
You will need:
- A vibratory bowl cleaner
- Non-corrosive solvent
- Metal media
Here are the steps
Step 1: Place the media, water, solvent, and suppressors components into the tumbler.
Step 2: use a locking mechanism to secure the tumbler, then turn it on for some hours.
Step 3: After removing the tumbler’s components, check if there are metal media in them. The wet tumbling can erode the suppressor’s parts if they don’t remove well.
6. Dip method
Although the method works, the cost associated is too great to justify the reward. If you decide to use the dip method, you should know how to dispose of the solution after cleaning the suppressor’s components. This is because mixing the chemicals can be dangerous and toxic.
You will need:
- Hydrogen peroxide
- Mason jar
- Vinegar
While Cleaning the Suppressor’s Components ensure:
- You follow the manufacturer’s instructions to avoid damaging the suppressor.
- You assemble the components properly to avoid damage
- You will clean your rimfire suppressor every 300-500 rounds
- You use the suitable solvent to dissolve all the fouling
- You use gloves and clean in a well-ventilated place
- You don’t use a vibrant tumbler when cleaning the suppressor
- You should not fire a suppressor while it is still wet inside.
7. Cleaning a Sealed Suppressor
A sealed suppressor simply means that these can’t be opened by the user. In the case of a sealed suppressor, you need to soak it in a particular solvent, which is appropriate for the material of the suppressor as per the maker’s instructions.
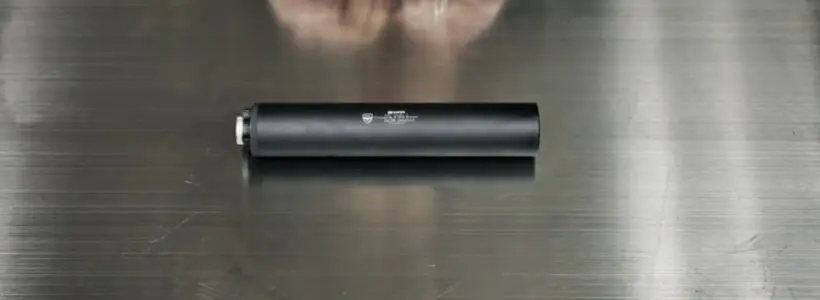
This is done to dissolve the lead and carbon away, which gets accumulated over time in the suppressor. If left unclean, it can clog and overflow the suppressor. After dissolving, you need to make sure that the suppressor’s completely dry before shooting with it.
But then again, the cleaning directions can be different based on what you are shooting. For example:
Related Guide: 5.56 SUPPRESSOR REVIEWS
Pistol Suppressors
These rarely need any cleaning, but if you are using a substantial amount of lead ammo, you need to clean it regularly. If you are not doing such, you can clean after a thousand rounds.
Rifle Suppressors
These nearly don’t need cleaning as the pressure in a suppressor is high enough to blow away any possible fouling. So, a fast solvent wash in a while is good enough to keep it clean if you have any doubts.
Rimfire Suppressors
These need cleaning all the time like just after 350 rounds or so. Here, a common rule is to clean it after shooting a brick of ammo as rimfire ammo quickly accumulates carbon and lead, which can clog your suppressor.
You need to know that most sealed suppressors don’t need much cleaning other than rimfire. So, these are mostly self-cleaning, which is pretty cool, right?
8: Cleaning a User-Serviceable Suppressors
A user-serviceable suppressor simply means that these can be opened by the user. In the case of a user-serviceable suppressor, you can apply similar cleaning techniques.
Here, the rimfire suppressors get fouled quickly, too, while the rifle and the pistol suppressors are self-cleaning for the most part. Basically, it doesn’t matter if it’s sealed or not. So, here goes the cleaning direction:
Taking the Suppressor Apart
Now, when taking apart your suppressor, you will find some kind of inner core with unusual holes and designs built into it or a “baffle stack”.
Both of these work to hold gas for sufficient time after firing a single round creating a silent shot. You still need to clean it irrespective of what the inside looks like.
Cleaning
Once you are done taking apart your suppressor, whether using your hand and general tools or a “baffle removal” tool, you need to use an appropriate solvent and a brush to clean it. You need to make sure that the carbon and lead deposits are removed.
Examining
If the suppressor that you have in your hands has a piston, you need to clean it properly and apply lube to it. You also need to examine and change any O-rings or rubber O-rings if it is needed.
And you need to keep in mind that you still need to follow the maker’s instructions for cleaning. You should do the same while reassembling the suppressor. If you don’t make mistakes, you might end up voiding the warranty of your suppressor.
Tips:
Start Cleaning a Suppressor Like an Expert Now!
Does cleaning a suppressor look like a hard job? Not at all – even for an inexperienced user, this will be a total piece of cake.
While the build of the compressors is complex, cleaning them is easy, as explained above, which means that you can spend more time shooting and less time cleaning. It sounds amazing, right?
There are many things to consider and tips to follow. But as long as you read this guide carefully and take our advice into account, you can always get rid of any carbon or lead deposits in any suppressors.
So, are you ready to start cleaning a suppressor like an expert? Don’t waste more time and begin now!
Wrapping Up
Before deciding on the cleaning method to use, it is essential to check the material used to make the suppressor prevent damaging it. It will be easy to clean in less time and more time enjoying quiet firing. I hope this article will guide you on the best cleaning method to choose from.