Suppressors are handy accessories for gun users. As true to their namesake, they suppress the sound of a gun and reduce their recoil. Modern suppressors often have enough sound reducing capabilities to make guns usable without hearing protection.
However, like all tools and accessories, suppressors are susceptible to being worn down through use. This leads to a decrease in performance, and that can be dangerous.
Gun owners should have their suppressor cleaning kit. This article will give you an idea of what to include and offer tips for cleaning a suppressor.
ALL ABOUT SUPPRESSOR CLEANING KIT
Rimfire and Centerfire Cleaning
Different types of suppressors require different degrees of maintenance. The main part of suppressor cleaning is the carbon residue in the parts. However, some suppressors leave little to no residue meaning that they can go longer without maintenance and not face any issues in performance.
Centerfire suppressors (suppressors often used for rifles) produce immense amounts of heat, especially when used to rapidly fire shots. The heat produced is enough to burn most of the residue from the parts, making it unnecessary to clean the parts.
Rimfire or pistol suppressors are in stark contrast to this. They do not produce enough heat to burn away the residue and require regular and careful cleaning on their part. If you use these, then remember to perform maintenance regularly, usually 500 rounds or so.
Must check : AR 15 suppressor review.
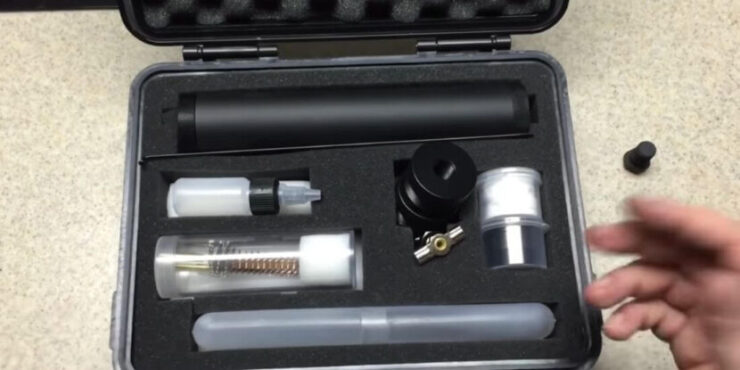
Suppressor Cleaning Kit Essentials
Some cleaning tools are essential to have for the proper maintenance of your suppressor. A suppressor doesn’t take a lot of equipment to clean but does have a few unique tools to make the cleaning process effective. These tools are:
Ultrasonic Cleaner
This is your essential cleaning tool. Due to how a suppressor is structured and the nature of residue building up, it is difficult to clean the carbon residue with your normal cleaning tools. Often time the deposits are clumped and clog parts of the suppressor hindering the performance immensely.
An ultrasonic cleaner emits sound waves of high frequency that aims to break down the lumps of residue. When the lumps have been broken down, you can proceed to remove them by simply shaking the suppressor or using a small brush in tandem.
Generally, any ultrasonic cleaner will suffice, provided you perform maintenance regularly. Large carbon build-up might take a long time to break down into smaller bits that can be removed, so be mindful.
Cleaning Solvent
It’s recommended to use specific suppressor cleaning solutions available in the market. These are specially made to be efficient when cleaning suppressors. They usually clean the suppressor well enough without damaging it and evaporate quickly, leaving no trace behind.
Solvent left behind in the suppressor can damage it. In case you do not have the proper cleaning solvent, you can opt for a few alternatives. One option is to use hot soapy water to rinse the suppressor in.
Properly wash the suppressor in said solution. After it has been properly rinsed, remove as much of the water as possible and use a dryer to evaporate any residual water left in the suppressor.
Paper Towels
While other cleaning rags might work, paper towels are recommended as they work better with suppressors. It is recommended to have a roll of them for your cleaning purposes, especially when wiping away some of the carbon.
Cleaning Brush
A brush with plastic bristles is recommended. If your brush has much harder bristles, you might end up leaving scratches on the suppressor and even damaging it.
If you have used the ultrasonic cleaner to break up the carbon build-up, you can easily remove the fine powder using a plastic brush.
Gloves
Less of a cleaning tool but an essential safety accessory to have. Alongside carbon, there is the presence of lead in your suppressor.
Cleaning without gloves poses a risk of contact with the lead that can be quite harmful to everyone. Wear a glove to ensure your safety during suppressor handling and maintenance.
Cleaning Tips
Here are some things you should keep in mind when trying to clean a suppressor:
Read the Manual Properly
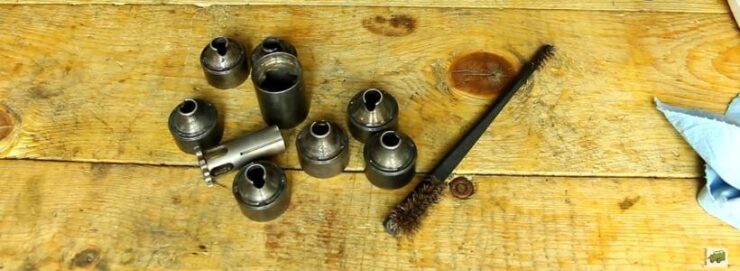
Take apart your suppressor before beginning the cleaning process. Before attempting to do so, read the instruction manual and see if there are some additional tools given to help with the process. Carelessly taking apart a suppressor will damage it and make it impossible to reassemble it.
Pay attention to the baffle design as the design will give you a clue on how to take it apart or separate it. After taking them apart, make sure not to lose them and organize them properly.
Make Use of the Ultrasonic Cleaner
Use the ultrasonic cleaner to do a primary cleaning. The purpose is to break up the carbon lumps and make the rest of the cleaning process smoother. Depending on how much residue has built up, you might spend a fair amount of time in this stage.
Use Cleaning Solvent
Apply cleaning solvent across the suppressor and wash properly. Pay attention to the edges as that is where a lot of residue gets lodged in.
Use Brush and Towels
Clean using your brush and towels. Remember to scrub the caps properly. Make sure all the solvent has dried up.
Reassemble
Reassemble your suppressor properly, making sure that no part is missing, and everything fits properly. If you misalign anything, it might not work.
Conclusion
Hopefully, this article has given you a good idea of what to include in your suppressor cleaning kit and how to go about cleaning a suppressor.