
The world first witnessed bipods on firearms during the hand cannons era in the 12th century. Hand cannons were virtually long cast iron barrels and the bipods used during the time were short poles. The short poles were placed under the barrel to support the large gun. Gun manufacturers adopted this idea in the mid-19th century, where the military used bipods on rifles in an improvised way.
The American Frontier, who hunted wild animals, was the first-ever to use bipods on their guns. Technology propelled bipods in the 20th century during the war errors where warsaw different gun users using different kinds of bipods. The technology has grown into more advanced levels where hinged legs, retractable legs, and extendable legs have become a regular feature of these bipods.
Today, bipod gun technology has led to different manufacturing advancements where lightweight materials such as titanium, carbon fiber, and aluminum materials are used. The attachment mechanisms on bipods have also changed. The footing material s on Bipods have also changed from stick or metal into rubber and basket designs which are made in a way to stop the bipod from sinking into soft surfaces such as snow and sand. Do you have a gun and want to mount your bipod on it? If so, then this guide will help you achieve this in very simple steps. But first, let us look at what a bipod.
What is a bipod?
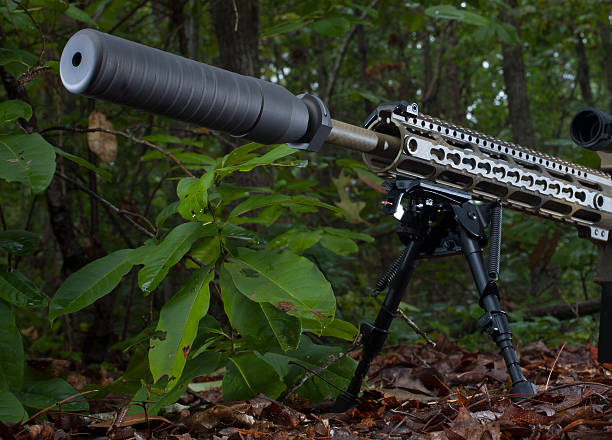
A bipod is a two-legged device mounted on guns to give additional support and steady the device—the device functions by providing significant stability on two axes of motion side-by-side and up and down.
This device is commonly used on machine guns and rifles, which are highly unsteady and have high recoil action. Through the bipod stand, the gun provides a forward rest and reduces its motion. Bipods allow gun holders to easily rest their heavy weapons on objects like concrete, sand, and snow, greatly reducing the fading accumulated.
The rail is made up of a strip that has been cut to form a “flattened T” with a hexagonal topping section, as well as cross slots and flats that enable accessories to be slid into place from the rail’s end and then locked in place.
Bipods can be of different adjustable lengths. Some can have a mechanism that allows them to be tilted, and the tilting position can be located close to the barrel’s central axis, which enables the weapon to be tilted either to the left side or the right side. More recent designs have emerged that allow the weapon to complete a three hundred and sixty degrees turn. Bipods can be fixed on studs or on the gun rail, which is fairly easy.
What is a stud?
A gun stud is often called a sling swivel stud and swivel stud. The device is a small mounting interface that slings and bipods are often attached. Bipod swivels are attached to long guns in several ways, either in wooden form or a machine screw that is attached to the stock. These attachment methods span to using a barrel band or other mounting methods like the M-LOK or Picatinny.
A bipod swivel stud can vary in measurements. The widest section part of the stud can have a measurement of 8.9 millimeters. The space between the flat surfaces measures around 7.6 millimeters, and the holding for mounting the bipod measures 3.7 millimeters.
Mounting standards
Do bipods need a stud to be mounted? Bipods do not necessarily need guns to have a swivel stud for them to be mounted. The two-legged device can be attached to a gun without a stud through other mounting standards. Mounting standards include; swivel stud mounting standard, Picatinny or the pic rail mounting standard, and the Versa-Pod spigot mounting standard. New emerging technology in the field of gun bipod mounting standard uses the arca-swiss style standard.
Picatinny (Mount without A Stud)
Do you want to increase your shooting accuracy? Bipods are made to make your shooting sessions easier. Adequate preparation of your gun is the best way of ensuring you enjoy your shooting session. To effectively improve your accuracy, the Picatinny technique for mounting your bipod does not require a stud. This method effectively reduces the workload on mounting and provides higher performance.
The Picatinny rail, commonly referred to as the ML-STD 1913 rail, is a gadget created primarily for military purposes, a rain interface system that enables the mounting processes of firearm accessories to be possible. Gun users initially installed the device at the top of the gun to enable the scopes’ mounting and enable receivers’ mounting, especially in large caliber rifles. The gadget can also be sued to attached; bayonets, slings, bipods, foregrips, reflex sight, night vision devices, laser aiming modules, tactical lights, and iron sights.
Ways of Bipod Mounting
Bipods can effectively be installed on rifles depending on the bipod’s design and structure and the gun that is being installed. The different attachment methods are; swivel stud installation on rifles, direct bipod attachment on the rifle stock, or bipod mounting on a Picatinny rail. The Picatinny mounting method is the best mounting method if your gun does not have a swivel stud.
Picatinny rails and attachments have countered iron sights in several weapons designs, and you can also use them on the bottom side of semi-automatic pistol grips and frames. Because of their utility, they’re now used in paintball and airsoft.
In making sure you correctly mount the bipod on the Picatinny rail, several tools and equipment are needed. The tools you will need for this DIY project are; Picatinny rail adapter, drill,2-part epoxy, a screwdriver with Philips’s bit, an eight-inch drill bit, and a small Allen wrench. These tools are readily available, and they are not that expensive.
After acquiring or ensuring that you have the tools mentioned above, you can dive into the bipod mounting steps.
Step 1: Removal of sling swivel
In this first step, if you have a sling swivel gun, you will need to remove it using a small wrench. It will mean that your gun will no longer have the support of the sling. The wrench will make the uninstallation process easy and smooth.
Step 2: lock washer
The next step is one of replacement. In this step, you will have to take the adapter and re-install it with the additional lock washer.
Step 3: Picatinny positioning
The next step involves installing the Picatinny into position. It is important to note that the Picatinny contains two different sides. The two sides are differentiated by the type of hole they have. The first side has a tapered hole, while the second side has a flat hole. When it comes to the positioning of the Picatinny, it should be done so that the tapered hole faces the rifle’s barrel end’s direction. If the tapered end faces the front, then the flat hole should be facing the rear end of the gun.
Step 4: Position The Drill
The preparation for drilling entails placing the Picatinny rail base on the rifle and taking the flat hole over the swing swivel hole. You should ensure that the sling swivel is positioned in place, and the sheath tightening process should involve a wrench. This step also consists of leveling the Picatinny rail.
Step 5: Drilling
When you establish that you have placed the rail base in the correct position, you can begin drilling. The drill used should be approximately ¼ ” in depth. The drill bit is placed through the tapered hole, which is over the Picatinny rail.
The drill will create a groove where the next step involves inserting the screws on the bipod into the respective rifle grooves created. You should fasten the screw tightly since this will be an important support structure for the gun.
Step 6: Confirmation
It is important to cross-check the work you have done to ensure that it meets the expected quality. A small amount of epoxy should be applied to the screw before its reinstallation to ensure a tight fit.
With these steps’ help, you can successfully install or mount a bipod without using a stud. A Picatinny rail is an efficient tool in rifles.
If you buy a gun that does not come with a stud and you prefer using the swivel stud to mount your bipod on, you can opt to manually install a stud for yourself, a process that is practical and easy. In conclusion, now that you have successfully installed a Picatinny at the front of your rifle, you can successfully mount it in your bipod and fasten it to ensure it is secure. Take your gun for the next hunt. When you go on your next hunt, make sure to use your bipod to ensure you test out your DIY skills and to know what corrections need to be made on the gun. Throughout the drilling process, you should ensure you are careful not to break the rail; secondly, you should also be careful when fastening screws to ensure there are no cracks or breaks.